As everyone’s online presence becomes more complex, it’s becoming harder and harder to keep track of details like URLs, usernames, passwords, and—increasingly—the graphic specifications associated with our online presence. This is especially true when it comes to website management and marketing.
In today’s security-conscious world, it’s always advisable to use different usernames and passwords for each website and social media platform you use. In addition, each social media platform generally has its own preferred measurements for graphics appearing in different places, such as header graphics, blog posts, profile pages, etc.
Dangers of Complacency
One of the dangers associated with the complexity of a marketing presence on multiple domains and sub-domains is that we often tend become overly dependent on our preferred web browser’s ability to store and automatically enter usernames and passwords when visiting different websites.
That is, of course, until the day you’re forced to use a different computer! When this happens, you may find yourself scurrying around looking for usernames and passwords that you’ve scribbled on different pieces of paper or stored in different files on your computer.
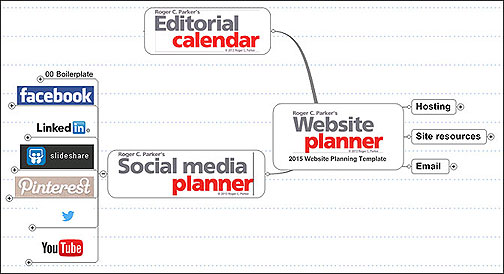
That’s why I created a downloadable Website Planner template. It offers a convenient place to consolidate the resources and specifications needed for your primary website, as well as any info needed to maintain your social media presence.
This Website Planner reflects MindManager’s ability to make a lot of data easily accessible, in a logical, flexible, and visual environment. For me, it simplified access to information that was previously in several different locations. It’s also saved me a lot of time when working with others.
Website Planner Benefits
If you’ve been following this series, you may have noticed that many of my previous Mindjet Dashboard templates, such as the Editorial Calendar, Expert Tracker, #Hashtag Tracker, Podcast Planner, and Presentation Planner have been content-oriented.
The Website Planner is slight departure, however. It’s emphasis is on details associated with accessing and updating your blog and website. As you’ll see when you download the template, there are a surprising amount of details that need to be available to keep your blog and social media functioning. These include:
- Vendor and access information. Besides your website and social media usernames and passwords, you need account information for your website hosting firm, your designer, and your email provider. In addition, there are often numerous third parties you rely on for specialized tasks. These frequently include blog post widgets, landing page and survey templates, tools for tracking web page traffic, hosting presentations and videos, alerting you to trends in your field, and freelancers you frequently hire. Note that the Hosting topic includes space to list any purchased, but unused, domain names, and URLs you’re interested in purchasing if they become available.
- Resources. I’ve included a Site Resources topic where you can link to graphic files — like photographs for your profile page – and boilerplate text describing your business or personal background. Having these key building blocks easily accessible saves time preparing profile statements, and ensures consistency.
- Standards. Another area where the Website Planner can help you save time is consolidating access to different standards, like the RGB color values and font choices that define your visual brand. It takes a lot more time to use Photoshop’s “Eyedropper tool” to identify one of your signature colors than to simply click on the Site Resources topic and Graphics subtopic. You can also include editing and formatting standards, like capitalization practices and other style choices.
- Specifications. Likewise, the preferred sizes for social media graphics not only differ from one site to another, there are differing sizes for graphics intended for the various locations within each site. Each site’s preferred size for header graphics and profile pictures, for example, are different than the ideal sizes for graphics intended for articles, updates, and sidebars. The more active you are in social media, the more you need to consolidate this information.
- Site resources. My clients and I have found it useful to include the URLs and filenames for downloadable incentives (white papers, eBooks) and free bonus resources like cheat sheets, checklists, templates, and worksheets. It’s also advantageous to keep track of the TinyURL and Bit.ly shortcuts to downloadable resources. This helps you avoid duplication, aids tracking traffic, and makes it easier to update bonus materials.
Online marketing success is most associated with copywriting and creativity. However, efficiency and sustainable success also depend on efficiently managing the details and eliminating time-traps.
Security Tips
- Given the importance of the information contained in the Website Planner—i.e., usernames and passwords– you might consider saving it on your computer under an innocuous name, i.e., 2012 Vacation Options, etc.
- Even better, you might consider using Mindjet’s security options, which allow you to encrypt your mind map and password-protect it. Select File > Info, then check Encrypt Document. You will then be prompted to provide (and confirm) a Password. After saving and closing the document, you (or others) will need to enter the password before re-opening the file.
- Because of the importance of the information in this mind map, you might consider hosting a copy online, at services like Mindjet Connect. This allows secure access to your Website Planner from any Internet-connected Mac or PC computer or laptop, as well as other Apple and Android devices.
Creating Linked Maps
As you become more active on multiple social media platforms, you may notice that the left and right sides of the Website Planning map are no longer visually balanced.
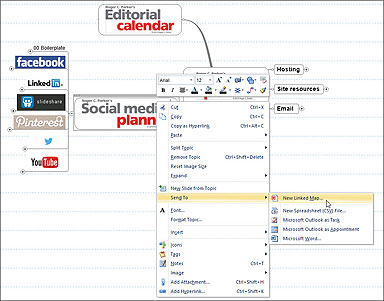
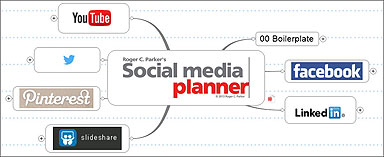
Mindjet’s MindManager File > Send To > New Linked Map offers a simple solution. When the Send to Mindjet MindManager dialog box appears, accept the defaults. These include using the selected topic as the center topic of the new map, deleting the original topics, and creating hyperlinks between the original and new map.
You’ll also be asked for a filename and location for the new linked map.
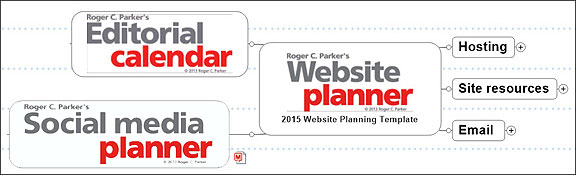
More important, as you can see above, your Website Planner mind map no longer “leans to the left!”
Managing your Mindjet Dashboard
MindManager’s Send To > New Mind Map command is one you’ll frequently use when creating dashboard maps. This feature allows you to keep your dashboard maps focused and manageable, yet you can find and search for names or data located in any of the linked maps.
In addition, MindManager’s File > View > Linked Maps command displays thumbnail images showing the links between your current, open map and other linked maps. This permits you to view each of the different mind maps that, together, make up your MindManager Dashboard.
How do you manage the details?
What are the tools or strategies you use to manage the details associated with today’s multiple-URL, multiple-vendor, and multiple-password online world? More importantly:
- How much time would it save you if you had Mindjet Dashboard access to the access codes, resources, standards, and specifications you need for all of your online marketing?
- Would a password-protected Website Planner help you increase your online security by making it easier to frequently change your passwords?
Share your concerns, experiences, and questions in the comments section, below.